

What is WebXRPress Library?
WebXRPress Library is an open source group of components (aka ’template entities’) that can be used to quickly create virtual reality based worlds and applications. It currently consists of a public repository in the form of a *PlayCanvas Editor project that you can optionally fork to jump start your own projects. In addition, there is a WordPress plugin to allow you to easily embed (in both directions) your creations into 2D web pages; AND embed 2D website pages into 3D virtual reality. WebXRPress aims to be one of the easiest and quickest ways to author and publish custom WebXR based creations. If you haven’t dived into *PlayCanvas Editor, you should familiarize yourself with creating your first project and review the PlayCanvas User Manual.
Getting Started
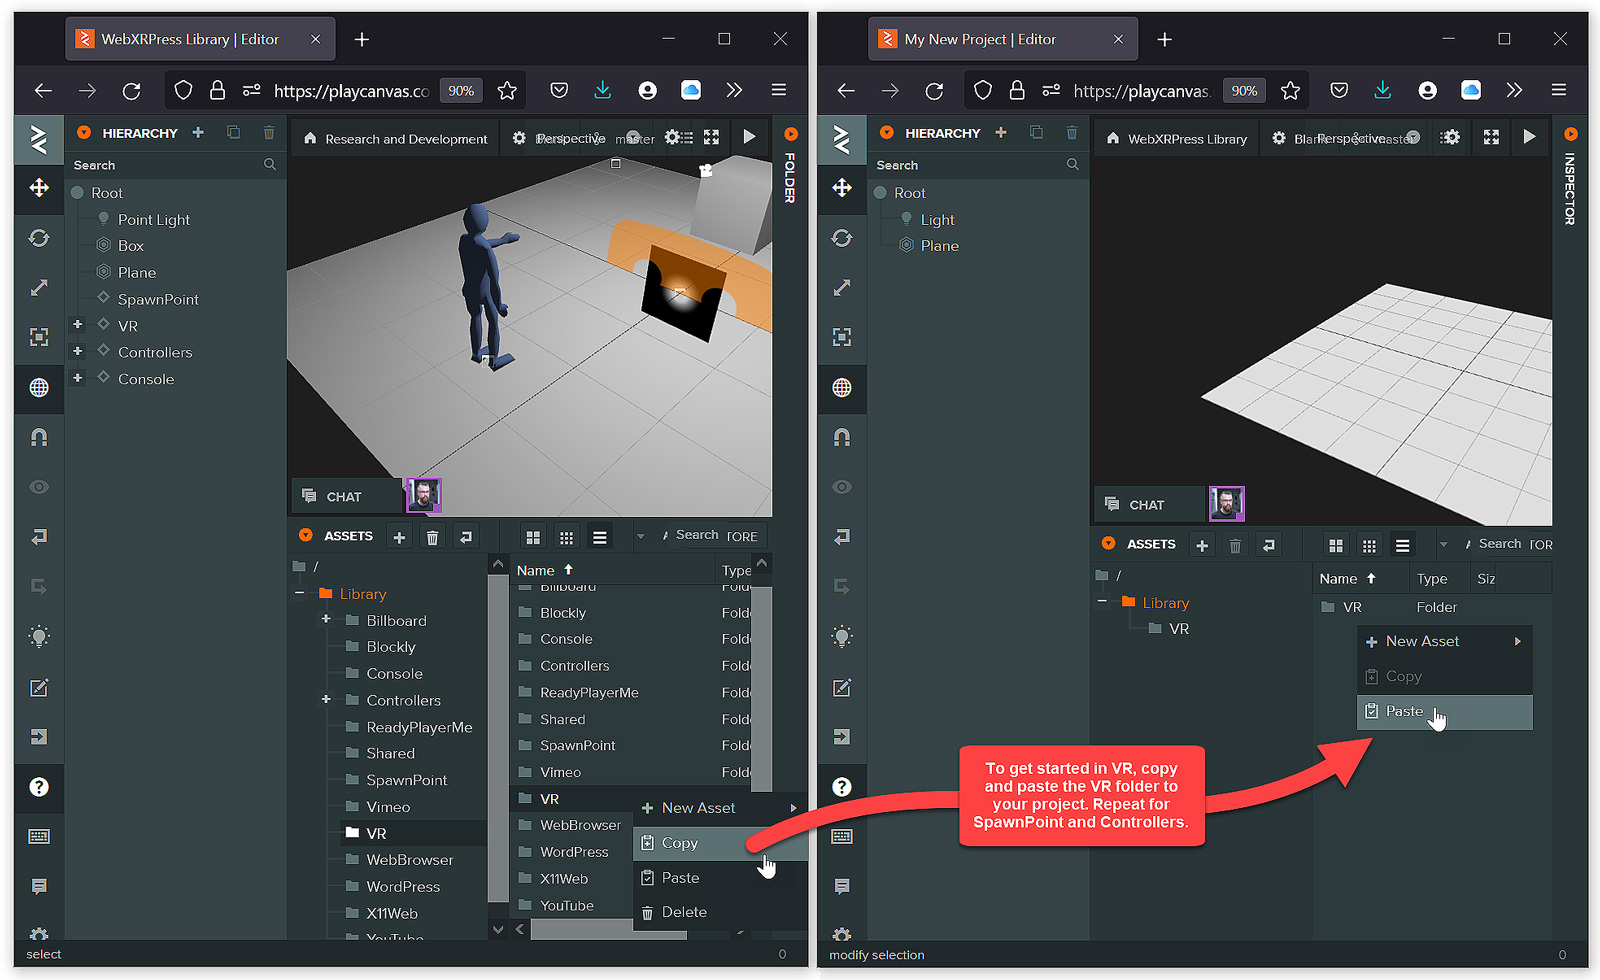
To use the WebXRPress Library, begin by creating a new blank project in one browser window, followed by opening the WebXRPress Library project in an adjacent window. Use the project’s Editor button to open the project in the editor and view the assets area containing the asset folders at the bottom of the window.
To aid in development on desktop computers without VR hardware, we would recommend using your supported desktop web browser with the WebXR Emulator extension available here for Firefox or here for Chrome.
WebXRPress Library components come in the form of ’template entities’ which reside in their respective asset folder. The asset folder will contain all the elements that make up the given asset’s functionality (often bitmaps, scripts, materials, etc.) including the template entity itself. The relevant template entity will appear as a diamond icon within a folder of the same name. See figure 1 below.
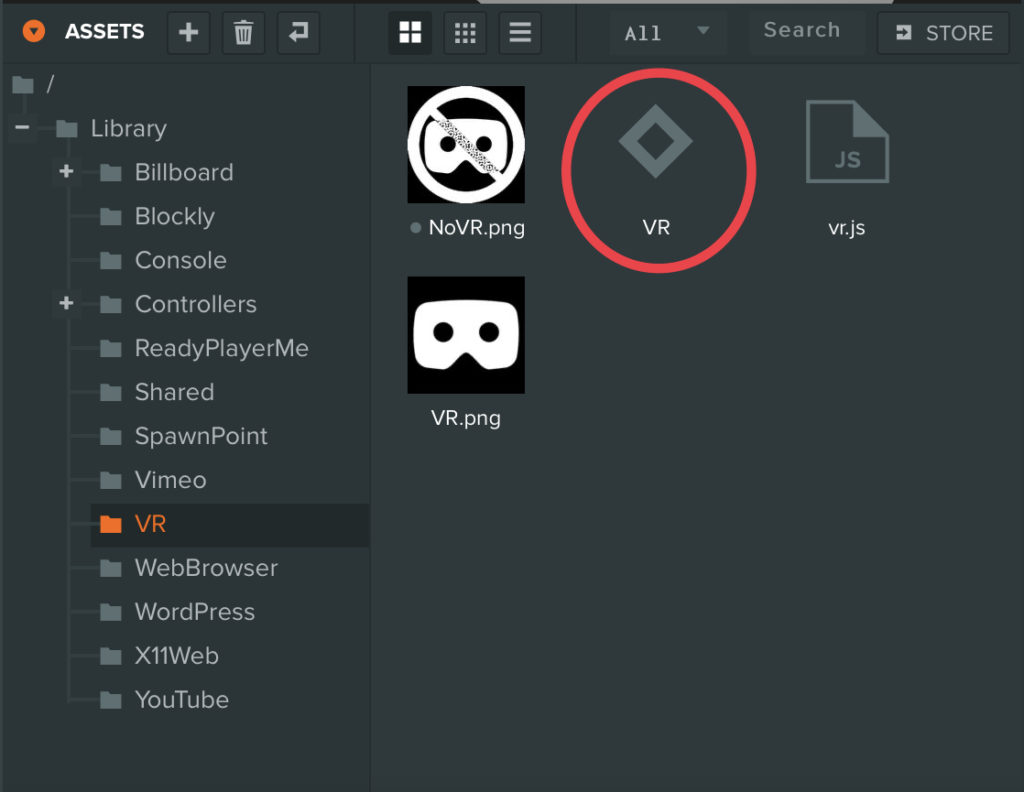
Typically, only one template entity (diamond icon) appears per folder. This convention will make it easy to locate the component you need to use amongst all the other dependent assets that create its functionality. You can copy the entire folder for a given component to your own project by using the copy and paste menus (right-click on Windows or cmd+click on macOS) on the folder. We recommend making a parent ”Library” folder inside your own project to house all the components you wish to use. See figure 2.
Enable Web Virtual Reality
The first component (aka ’template entity’; diamond icon) you will want to use is from the VR folder. This template entity will start the virtual reality experience. When creating a VR application on the web, the web browser will display the application as an embedded rectangular region within the web page; not unlike a YouTube video. Before the user can begin virtual reality mode, they will need to click on the HMD (headset mounted display) icon. This is akin to pressing the right pointing play icon on YouTube videos that users are accustomed to clicking to begin video playback. See figure 3 below for an example of an orange HMD icon.

Subsequent additional dialogs may appear to authorize full screen, audio, or other various security attributes depending on the hardware and web browser settings of the visitor. In most cases the latter authorizations are only asked the first time a website domain is visited and requests VR resources; such as access to the microphone, etc.
After copying the VR folder to your own project, locate and click on the VR diamond icon from within the VR folder; see #1 and #2 in figure 4 below. Drag the VR icon to the root of your project’s hierarchy; see #3 in figure 4. The VR component is known as a singleton. Singleton means that only one instance of this template entity should appear in your project hierarchy list; as only one is needed to invoke a virtual reality session. In addition to the VR folder, you will want to repeat the steps for the Shared folder. As the name implies, the Shared folder contains scripts that all the template entities share.
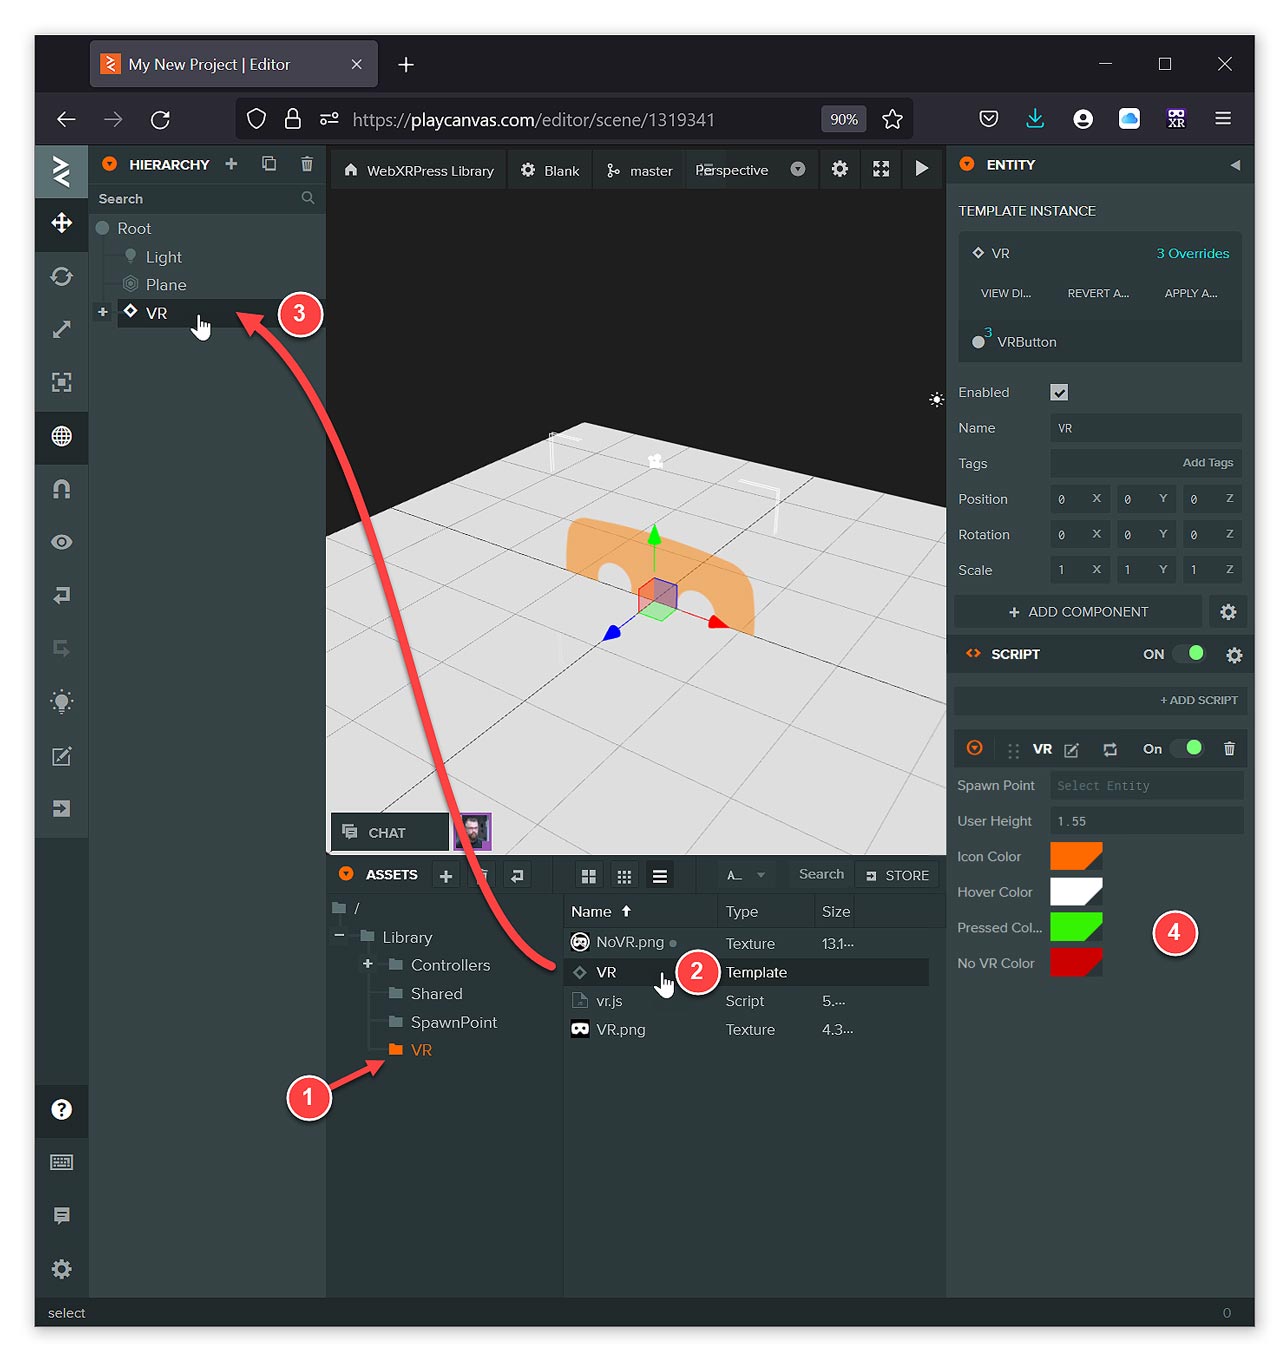
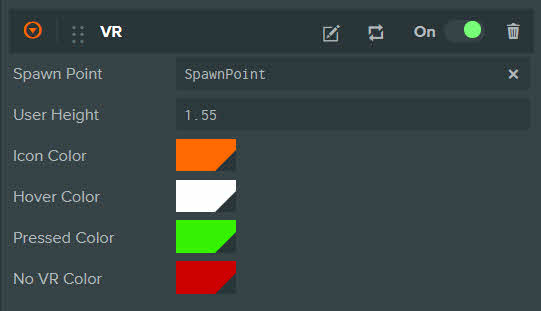
The VR component has options; notice that you can customize the color of the HMD icon, its hover color, and pressed color, to match your application’s theme using the script attributes section; see area #4 in figure 4 above. You can also specify the ‘No VR Color’; the setting used for the color of the HMD icon with a slash through it to indicate that VR is unavailable. To see these attributes, select the VR node in the hierarchy panel and the script attributes will appear. Also note that you may specify a ’Spawn Point’ by name in the Spawn Point field (see figure 5). Repeat the steps in figure 2 to add a Spawn Point component to your project by copying the Spawn Point folder to your project and dragging the Spawn Point’s template entity (diamond icon) to the root of your project’s hierarchy. You will need at least one Spawn Point in your project.
Starting Spawn Point
A Spawn Point is the point-of-view from which the virtual reality session will begin. When added to your root hierarchy, it will appear as a blue human figurine with the left arm extended and pointing in the direction the virtual reality camera will view (see the first image in figure 2). By default, the VR component will use the first Spawn Point that appears in your project hierarchy. However, you can specify the Spawn Point to use in the VR script attributes. The blue human figurine is merely a design-time reference that you can use to position the user’s point of view; it will disappear when your project is running (aka ‘runtime’).
You can use multiple points to programmatically position users throughout your game. It is important to give each Spawn Point a unique name when working with multiple Spawn Points.
Note: when selecting template entities in PlayCanvas Editor, be sure to use/select the diamond icon using the Hierarchy panel; as using the 3D preview window may inadvertently select a child element.
Adding Hand Controllers
Most games and applications will utilize hand controllers for various tasks in virtual reality. To assist in easily adding hand controllers to your virtual reality project, simply copy the Controllers folder from WebXRPress Library. Locate the diamond icon as you did for the VR and Spawn Point components and drag it to the root of your project. The Controllers template entity is a singleton like the VR template entity; only one instance of the Controllers template entity should exist in your project’s hierarchy. With the Controllers node selected in the hierarchy window; look at the scripts attribute panel. It should appear as shown in figure 6 below.
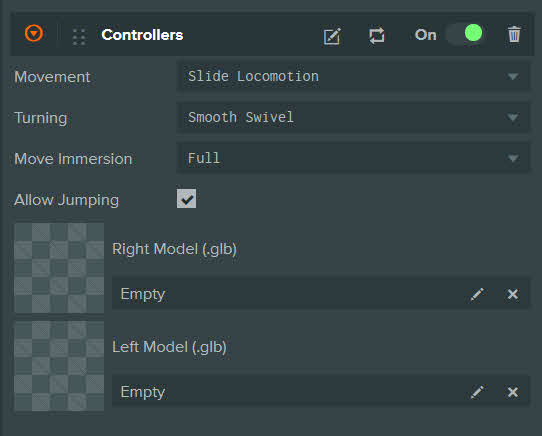
The Controllers’ script attributes panel has several fields that set virtual reality navigation options. By default, the template entity will automatically display the detected hardware platform controllers when possible. For example, if you are viewing your application in a Meta (formerly Oculus) Quest 2, you will see the white Oculus touch hand controllers. You can override the default and furnish your own models by selecting a valid .glb model files using the attributes for ‘Right’ and ‘Left’ models. Leave these fields empty to have hardware detected controllers automatically added at runtime.
Locomotion Primer
The locomotion system used in WebXRPress Library is coded to match the majority of existing native game and virtual reality apps. The left controller’s joystick is used for directional movement forward, backward, and side-to-side. The right controller is used with the right joystick to turn the user; rotating to the right (clockwise) or left (counter-clockwise). Jumping is supported by depressing the right joystick. These settings are typical for many XBox, Playstation, and Meta/Oculus first person perspective games; including Meta’s own Horizon branded applications (Horizon World, Horizon Venues, and Horizon Workplace). Unlike Horizon, WebXRPress Library features more responsive, adaptive acceleration. Using the slide locomotion and smooth swivel turning modes allow for slower or faster movement depending on how far the user moves the joystick controllers (see video 1 – Locomotion System below). This core navigation behavior is considered LTS (long term support); with modifications and other options possible in future releases.
Note: Currently the only option for movement settings is ‘Slide Locomotion’; the ‘Teleport’ option is pending release of additional physics based template entities.
The locomotion system includes immersion settings that can be set to reduce motion sickness. These features are common in virtual reality applications and the most common options have been included in WebXRPress Library. The Controller template entity includes the following immersion settings for ‘Turning’ (reference figure 6):
- Snap 30 degrees
- Snap 45 degrees
- Snap 90 degrees
- Smooth Swivel (default)
In addition to turning options; the immersion level can be used to reduce motion sickness by incorporating a vignette by varying degrees. The vignette appears based on motion (see video 2 – Immersion Settings):
- Narrow – view area is reduced by the greatest amount when moving
- Medium – view area is moderately reduced when moving
- Full – full immersion, no vignette appears (default)
Pingback: Exploring the PlayCanvas VR Starter Kit – vrhermit